What Is Hive
Hive is a data warehousing infrastructure based on Apache Hadoop. Hadoop provides massive scale out and fault tolerance capabilities for data storage and processing on commodity hardware.
Hive is designed to enable easy data summarization, ad-hoc querying and analysis of large volumes of data. It provides SQL which enables users to do ad-hoc querying, summarization and data analysis easily. At the same time, Hive’s SQL gives users multiple places to integrate their own functionality to do custom analysis, such as User Defined Functions (UDFs).
Data Units
In the order of granularity – Hive data is organized into:
- Databases: Namespaces function to avoid naming conflicts for tables, views, partitions, columns, and so on. Databases can also be used to enforce security for a user or group of users.
- Tables: Homogeneous units of data which have the same schema. An example of a table could be page_views table, where each row could comprise of the following columns (schema):
- timestamp—which is of INT type that corresponds to a UNIX timestamp of when the page was viewed.
- userid—which is of BIGINT type that identifies the user who viewed the page.
- page_url—which is of STRING type that captures the location of the page.
- referer_url—which is of STRING that captures the location of the page from where the user arrived at the current page.
- IP—which is of STRING type that captures the IP address from where the page request was made.
- Partitions: Each Table can have one or more partition Keys which determines how the data is stored. Partitions—apart from being storage units—also allow the user to efficiently identify the rows that satisfy a specified criteria; for example, a date_partition of type STRING and country_partition of type STRING. Each unique value of the partition keys defines a partition of the Table. For example, all “US” data from “2009-12-23” is a partition of the page_views table. Therefore, if you run analysis on only the “US” data for 2009-12-23, you can run that query only on the relevant partition of the table, thereby speeding up the analysis significantly. Note however, that just because a partition is named 2009-12-23 does not mean that it contains all or only data from that date; partitions are named after dates for convenience; it is the user’s job to guarantee the relationship between partition name and data content! Partition columns are virtual columns, they are not part of the data itself but are derived on load.
- Buckets(or Clusters): Data in each partition may in turn be divided into Buckets based on the value of a hash function of some column of the Table. For example the page_views table may be bucketed by userid, which is one of the columns, other than the partitions columns, of the page_view table. These can be used to efficiently sample the data.
Note that it is not necessary for tables to be partitioned or bucketed, but these abstractions allow the system to prune large quantities of data during query processing, resulting in faster query execution.
Type System
Hive supports primitive and complex data types, as described below. See Hive Data Types for additional information.
Primitive Types
- Types are associated with the columns in the tables. The following Primitive types are supported:
- Integers
- TINYINT—1 byte integer
- SMALLINT—2 byte integer
- INT—4 byte integer
- BIGINT—8 byte integer
- Boolean type
- BOOLEAN—TRUE/FALSE
- Floating point numbers
- FLOAT—single precision
- DOUBLE—Double precision
- Fixed point numbers
- DECIMAL—a fixed point value of user defined scale and precision
- String types
- STRING—sequence of characters in a specified character set
- VARCHAR—sequence of characters in a specified character set with a maximum length
- CHAR—sequence of characters in a specified character set with a defined length
- Date and time types
- TIMESTAMP—a specific point in time, up to nanosecond precision
- DATE—a date
- Binary types
- BINARY—a sequence of bytes
Complex Types
Complex Types can be built up from primitive types and other composite types using:
- Structs: the elements within the type can be accessed using the DOT (.) notation. For example, for a column c of type STRUCT {a INT; b INT}, the a field is accessed by the expression c.a
- Maps (key-value tuples): The elements are accessed using [‘element name’] notation. For example in a map M comprising of a mapping from ‘group’ -> gid the gid value can be accessed using M[‘group’]
- Arrays (indexable lists): The elements in the array have to be in the same type. Elements can be accessed using the [n] notation where n is an index (zero-based) into the array. For example, for an array A having the elements [‘a’, ‘b’, ‘c’], A[1] retruns ‘b’.
Using the primitive types and the constructs for creating complex types, types with arbitrary levels of nesting can be created. For example, a type User may comprise of the following fields:
- gender—which is a STRING.
- active—which is a BOOLEAN.
Built In Operators and Functions
The operators and functions listed below are not necessarily up to date. (Hive Operators and UDFs has more current information.) In Beeline or the Hive CLI, use these commands to show the latest documentation:
| SHOW FUNCTIONS;
DESCRIBE FUNCTION ; DESCRIBE FUNCTION EXTENDED ; |
Case-insensitive
All Hive keywords are case-insensitive, including the names of Hive operators and functions.
Built In Operators
- Relational Operators—The following operators compare the passed operands and generate a TRUE or FALSE value, depending on whether the comparison between the operands holds or not.
| Relational Operator | Operand types | Description |
| A = B | all primitive types | TRUE if expression A is equivalent to expression B; otherwise FALSE |
| A != B | all primitive types | TRUE if expression A is not equivalent to expression B; otherwise FALSE |
| A < B | all primitive types | TRUE if expression A is less than expression B; otherwise FALSE |
| A <= B | all primitive types | TRUE if expression A is less than or equal to expression B; otherwise FALSE |
| A > B | all primitive types | TRUE if expression A is greater than expression B] otherwise FALSE |
| A >= B | all primitive types | TRUE if expression A is greater than or equal to expression B otherwise FALSE |
| A IS NULL | all types | TRUE if expression A evaluates to NULL otherwise FALSE |
| A IS NOT NULL | all types | FALSE if expression A evaluates to NULL otherwise TRUE |
| A LIKE B | strings | TRUE if string A matches the SQL simple regular expression B, otherwise FALSE. The comparison is done character by character. The _ character in B matches any character in A (similar to . in posix regular expressions), and the % character in B matches an arbitrary number of characters in A (similar to .* in posix regular expressions). For example, ‘foobar’ LIKE ‘foo’ evaluates to FALSE where as ‘foobar’ LIKE ‘foo___’ evaluates to TRUE and so does ‘foobar’ LIKE ‘foo%’. To escape % use \ (% matches one % character). If the data contains a semicolon, and you want to search for it, it needs to be escaped, columnValue LIKE ‘a\;b’ |
| A RLIKE B | strings | NULL if A or B is NULL, TRUE if any (possibly empty) substring of A matches the Java regular expression B (see Java regular expressions syntax), otherwise FALSE. For example, ‘foobar’ rlike ‘foo’ evaluates to TRUE and so does ‘foobar’ rlike ‘^f.*r$’. |
| A REGEXP B | strings | Same as RLIKE |
- Arithmetic Operators—The following operators support various common arithmetic operations on the operands. All of them return number types.
| Arithmetic Operators | Operand types | Description |
| A + B | all number types | Gives the result of adding A and B. The type of the result is the same as the common parent(in the type hierarchy) of the types of the operands, for example, since every integer is a float. Therefore, float is a containing type of integer so the + operator on a float and an int will result in a float. |
| A – B | all number types | Gives the result of subtracting B from A. The type of the result is the same as the common parent(in the type hierarchy) of the types of the operands. |
| A * B | all number types | Gives the result of multiplying A and B. The type of the result is the same as the common parent(in the type hierarchy) of the types of the operands. Note that if the multiplication causing overflow, you will have to cast one of the operators to a type higher in the type hierarchy. |
| A / B | all number types | Gives the result of dividing B from A. The type of the result is the same as the common parent(in the type hierarchy) of the types of the operands. If the operands are integer types, then the result is the quotient of the division. |
| A % B | all number types | Gives the reminder resulting from dividing A by B. The type of the result is the same as the common parent(in the type hierarchy) of the types of the operands. |
| A & B | all number types | Gives the result of bitwise AND of A and B. The type of the result is the same as the common parent(in the type hierarchy) of the types of the operands. |
| A | B | all number types | Gives the result of bitwise OR of A and B. The type of the result is the same as the common parent(in the type hierarchy) of the types of the operands. |
| A ^ B | all number types | Gives the result of bitwise XOR of A and B. The type of the result is the same as the common parent(in the type hierarchy) of the types of the operands. |
| ~A | all number types | Gives the result of bitwise NOT of A. The type of the result is the same as the type of A. |
- Logical Operators— The following operators provide support for creating logical expressions. All of them return boolean TRUE or FALSE depending upon the boolean values of the operands.
| Logical Operators | Operands types | Description |
| A AND B | boolean | TRUE if both A and B are TRUE, otherwise FALSE |
| A && B | boolean | Same as A AND B |
| A OR B | boolean | TRUE if either A or B or both are TRUE, otherwise FALSE |
| A || B | boolean | Same as A OR B |
| NOT A | boolean | TRUE if A is FALSE, otherwise FALSE |
| !A | boolean | Same as NOT A |
- Operators on Complex Types—The following operators provide mechanisms to access elements in Complex Types
| Operator | Operand types | Description |
| A[n] | A is an Array and n is an int | returns the nth element in the array A. The first element has index 0, for example, if A is an array comprising of [‘foo’, ‘bar’] then A[0] returns ‘foo’ and A[1] returns ‘bar’ |
| M[key] | M is a Map and key has type K | returns the value corresponding to the key in the map for example, if M is a map comprising of {‘f’ -> ‘foo’, ‘b’ -> ‘bar’, ‘all’ -> ‘foobar’} then M[‘all’] returns ‘foobar’ |
| S.x | S is a struct | returns the x field of S, for example, for struct foobar {int foo, int bar} foobar.foo returns the integer stored in the foo field of the struct. |
Built In Functions
- Hive supports the following built in functions:
(Function list in source code: FunctionRegistry.java)
| Return Type | Function Name (Signature) | Description |
| Return Type | Function Name (Signature) | Description |
| BIGINT | round(double a) | returns the rounded BIGINT value of the double |
| BIGINT | floor(double a) | returns the maximum BIGINT value that is equal or less than the double |
| BIGINT | ceil(double a) | returns the minimum BIGINT value that is equal or greater than the double |
| double | rand(), rand(int seed) | returns a random number (that changes from row to row). Specifiying the seed will make sure the generated random number sequence is deterministic. |
| string | concat(string A, string B,…) | returns the string resulting from concatenating B after A. For example, concat(‘foo’, ‘bar’) results in ‘foobar’. This function accepts arbitrary number of arguments and return the concatenation of all of them. |
| string | substr(string A, int start) | returns the substring of A starting from start position till the end of string A. For example, substr(‘foobar’, 4) results in ‘bar’ |
| string | substr(string A, int start, int length) | returns the substring of A starting from start position with the given length, for example, substr(‘foobar’, 4, 2) results in ‘ba’ |
| string | upper(string A) | returns the string resulting from converting all characters of A to upper case, for example, upper(‘fOoBaR’) results in ‘FOOBAR’ |
| string | ucase(string A) | Same as upper |
| string | lower(string A) | returns the string resulting from converting all characters of B to lower case, for example, lower(‘fOoBaR’) results in ‘foobar’ |
| string | lcase(string A) | Same as lower |
| string | trim(string A) | returns the string resulting from trimming spaces from both ends of A, for example, trim(‘ foobar ‘) results in ‘foobar’ |
| string | ltrim(string A) | returns the string resulting from trimming spaces from the beginning(left hand side) of A. For example, ltrim(‘ foobar ‘) results in ‘foobar ‘ |
| string | rtrim(string A) | returns the string resulting from trimming spaces from the end(right hand side) of A. For example, rtrim(‘ foobar ‘) results in ‘ foobar’ |
| string | regexp_replace(string A, string B, string C) | returns the string resulting from replacing all substrings in B that match the Java regular expression syntax(See Java regular expressions syntax) with C. For example, regexp_replace(‘foobar’, ‘oo|ar’, ) returns ‘fb’ |
| int | size(Map) | returns the number of elements in the map type |
| int | size(Array) | returns the number of elements in the array type |
| value of | cast( as ) | converts the results of the expression expr to , for example, cast(‘1’ as BIGINT) will convert the string ‘1’ to it integral representation. A null is returned if the conversion does not succeed. |
| string | from_unixtime(int unixtime) | convert the number of seconds from the UNIX epoch (1970-01-01 00:00:00 UTC) to a string representing the timestamp of that moment in the current system time zone in the format of “1970-01-01 00:00:00” |
| string | to_date(string timestamp) | Return the date part of a timestamp string: to_date(“1970-01-01 00:00:00”) = “1970-01-01” |
| int | year(string date) | Return the year part of a date or a timestamp string: year(“1970-01-01 00:00:00”) = 1970, year(“1970-01-01”) = 1970 |
| int | month(string date) | Return the month part of a date or a timestamp string: month(“1970-11-01 00:00:00”) = 11, month(“1970-11-01”) = 11 |
| int | day(string date) | Return the day part of a date or a timestamp string: day(“1970-11-01 00:00:00”) = 1, day(“1970-11-01”) = 1 |
| string | get_json_object(string json_string, string path) | Extract json object from a json string based on json path specified, and return json string of the extracted json object. It will return null if the input json string is invalid. |
- The following built in aggregate functions are supported in Hive:
| Return Type | Aggregation Function Name (Signature) | Description |
| BIGINT | count(*), count(expr), count(DISTINCT expr[, expr_.]) | count(*)—Returns the total number of retrieved rows, including rows containing NULL values; count(expr)—Returns the number of rows for which the supplied expression is non-NULL; count(DISTINCT expr[, expr])—Returns the number of rows for which the supplied expression(s) are unique and non-NULL. |
| DOUBLE | sum(col), sum(DISTINCT col) | returns the sum of the elements in the group or the sum of the distinct values of the column in the group |
| DOUBLE | avg(col), avg(DISTINCT col) | returns the average of the elements in the group or the average of the distinct values of the column in the group |
| DOUBLE | min(col) | returns the minimum value of the column in the group |
| DOUBLE | max(col) | returns the maximum value of the column in the group |
Language Capabilities
Hive’s SQL provides the basic SQL operations. These operations work on tables or partitions. These operations are:
- Ability to filter rows from a table using a WHERE clause.
- Ability to select certain columns from the table using a SELECT clause.
- Ability to do equi-joins between two tables.
- Ability to evaluate aggregations on multiple “group by” columns for the data stored in a table.
- Ability to store the results of a query into another table.
- Ability to download the contents of a table to a local (for example,, nfs) directory.
- Ability to store the results of a query in a hadoop dfs directory.
- Ability to manage tables and partitions (create, drop and alter).
- Ability to plug in custom scripts in the language of choice for custom map/reduce jobs.
Note : All the above contents are copied from apache wiki.
Data Definition Language (DDL)
DDL statements are used to build and modify the tables and other objects in the database.
Example : CREATE, DROP, TRUNCATE, ALTER, SHOW, DESCRIBE Statements.
Go to Hive shell by giving the command sudo hive and enter the command ‘create database’ to create the new database in the Hive.
create database if not exists retail;
Show Database Command in Hive :
We can view the list of existing databases in the current schema.
show databases;
The database creates in a default location of the Hive warehouse. Hive database store in /user/hive/warehouse.
Drop Database in Hive :
This command is used for deleting an already created database in Hive and the syntax is as follows –
DROP (DATABASE) [IF EXISTS] database_name [RESTRICT|CASCADE];
drop database if exists firstDB CASCADE;
In Hive, the mode is set as RESTRICT by default and users cannot delete it unless it is non-empty. For deleting a database in Hive along with the existing tables, users must change the mode from RESTRICT to CASCADE.
In the syntax for drop database Hive command, “if exists” clause is used to avoid any errors that might occur if the programmer tries to delete a database which does not exist.
Alter Database Command in Hive :
Whenever the developers need to change the metadata of any of the databases, alter hive DDL command can be used as follows –
ALTER (DATABASE) database_name SET DBPROPERTIES (property_name=property_value, …);
Let’s use the Alter command to modify the OWNER property and specify the role for the owner –
ALTER (DATABASE) database_name SET OWNER [USER|ROLE] user_or_role;
alter database retail set OWNER ROLE admin;
The command to use the database is USE
use retail;
Create a text file items.txt. Sample contents are given below;
10000001,Shirt,All,OT-1,Others,10,1250,1250,9,admin
10000007,Formal Shirts,36,Crocodile-02,CROCODILE,5,800,800,78,admin
10000008,Shirt,All,PUMA-9,PUMA,5,2000,2000,55,ashok
10000011,Shirt,All,REE-1,REEBOK,5,1250,1250,4,admin
10000012,Shirt,All,SIGN-1,SIGNATURE,5,1550,1550,55,admin
10000013,Shirt,All,PUMA-2,PUMA,5,789,789,87,admin
10000014,Shirt,All,PUMA-4,PUMA,10,599,599,20,admin
10000015,Shirt,All,PUMA-5,PUMA,10,699,699,38,admin
10000016,Shirt,All,PUMA-6,PUMA,10,999,999,120,admin
10000017,Shirt,All,PUMA-7,PUMA,10,899,899,80,admin
10000018,Shirt,All,Crocodile-01,CROCODILE,10,999,999,90,admin
10000019,Shirt,All,Crocodile-03,CROCODILE,10,799,799,120,admin
10000020,Shirt,All,Crocodile-04,CROCODILE,10,879,879,120,admin
10000021,Shirt,All,Crocodile-05,CROCODILE,15,599,599,120,admin
10000022,Shirt,All,Crocodile-06,CROCODILE,15,1299,1299,120,admin
10000023,Shirt,All,Crocodile-07,CROCODILE,15,1199,1199,99,admin
10000024,Shirt,All,Crocodile-08,CROCODILE,15,699,699,88,admin
10000025,Shirt,All,OT-9,Others,2,999,999,99,admin
10000026,Shirt,All,OT-1,Others,5,999,999,90,admin
Copy the input data to HDFS from local by using the copy From Local command.
hdfs dfs -copyFromLocal /home/ubuntu/Documents/WorkingFiles/items.txt hdfs:/
The following command creates a table with in location of “/user/hive/warehouse/retail.db”
Note : retail.db is the database created in the Hive warehouse.
create table if not exists items(BarcodeId INT,ItemHeadId String,Size String,ModelNo String,Company String,Discount double,SaleRate double,MRP double,StockQty int,CreatedBy String)
row format delimited fields terminated by ',' stored as textfile;
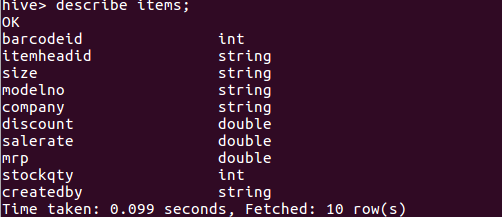
Describe provides information about the schema of the table.
describe items;
How to create a table in hive by copying an existing table schema :
Hive lets programmers create a new table by replicating the schema of an existing table but remember only the schema of the new table is replicated but not the data. When creating the new table, the location parameter can be specified.
CREATE TABLE [IF NOT EXISTS] [db_name.]table_name Like [db_name].existing_table [LOCATION hdfs_path]
create table if not exists itemscopy like items location '/user/hive/warehouse/retail.db/itemscopy';
DROP Table Command in Hive :
Drops the table and all the data associated with it in the Hive metastore.
DROP TABLE [IF EXISTS] table_name [PURGE];
drop table if exists itemscopy purge; // verify in hdfs - browser
DROP table command removes the metadata and data for a particular table. Data is usually moved to .Trash/Current directory if Trash is configured. If PURGE option is specified then the table data will not go to the trash directory and there will be no scope to retrieve the data in case of erroneous DROP command execution.
TRUNCATE Table Command in Hive :
This hive command is used to truncate all the rows present in a table i.e. it deletes all the data from the Hive meta store and the data cannot be restored.
TRUNCATE TABLE [db_name].table_name
truncate table items;
ALTER Table Command in Hive :
Using ALTER Table command, the structure and metadata of the table can be modified even after the table has been created. Let’s try to change the name of an existing table using the ALTER command –
ALTER TABLE [db_name].old_table_name RENAME TO [db_name].new_table_name;
alter table items rename to item;
Syntax to ALTER Table Properties.
ALTER TABLE [db_name].tablename SET TBLPROPERTIES (‘property_key’=’property_new_value’)
alter table items set TBLPROPERTIES ('creator' = 'admin');
In the above step, we have set the creator attribute for the table and similarly we can later modify other table properites also.
alter table items set TBLPROPERTIES ('comment' = 'changed the creator to admin');
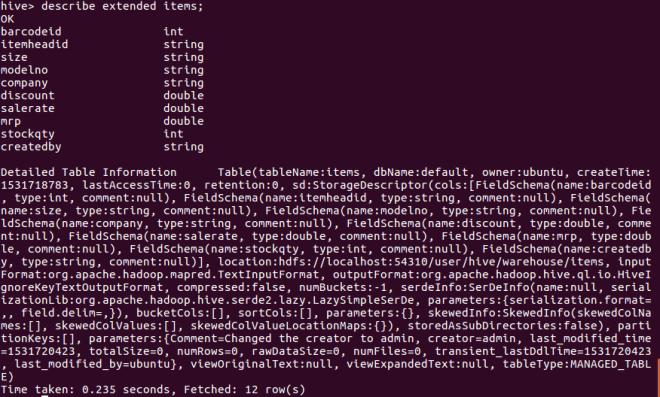
DESCRIBE Table Command in Hive :
Gives the information of a particular table and the syntax is as follows –
DESCRIBE [EXTENDED|FORMATTED] [db_name].[table_name] [col_name/field_name]
describe items;
describe extended items;
describe formatted items;
describe extended items BarcodeId;

Show Table Command in Hive :
Gives the list of existing tables in the current database schema.
show tables;
Data Manipulation Language (DML)
DML statements are used to retrieve, store, modify, delete, insert and update data in the database.
Example : LOAD, INSERT Statements.
Syntax :
LOAD data inpath into table [tablename]
The Load operation is used to move the data into corresponding Hive table. If the keyword local is specified, then the load command will point to the local file system path. If the keyword local is not specified we have to use the HDFS path of the file.
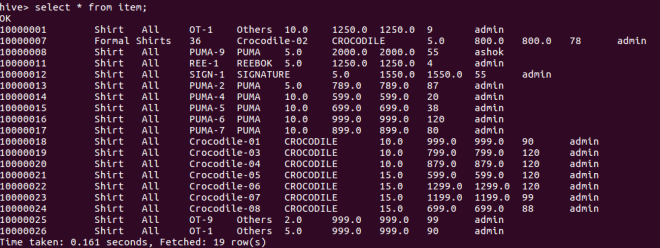
LOAD DATA INPATH '/items.txt' OVERWRITE INTO TABLE item;
You can verify items.txt file in “/user/hive/warehouse/retail.db/item”(http://localhost:50070/).
select * from item;
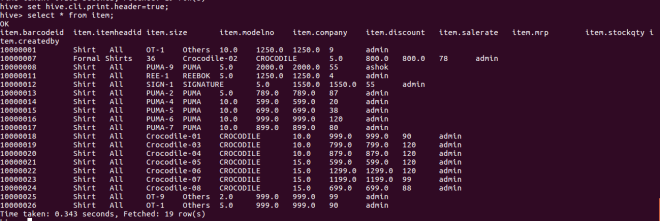
to print header/column names ;
set hive.cli.print.header=true;
select * from item;
Here is one example for the LOAD data LOCAL command.
Create a file named as employees.txt. Sample contents are given below;
EMP0001,Akash,akash@gmail.com,Bangalore,Karnataka,9090823312,Dept01
EMP0002,Arjun,arjun@gmail.com,Mysore,Karnataka,9110432312,Dept02
EMP0003,Debasis,debasis@gmail.com,Bangalore,Karnataka,9110853112,Dept01
EMP0004,Jyotiskar,jyotiskar@gmail.com,Mysore,Karnataka,8911841122,Dept02
EMP0005,Asutosh,asutosh@gmail.com,Mysore,Karnataka,9090823332,Dept01
EMP0006,Subhasis,subhasis@gmail.com,Mysore,Karnataka,9092823312,Dept02
EMP0008,Nagarjuna,nagarjuna@gmail.com,Mangalore,Karnataka,9122121312,Dept01
EMP0009,Madhuri,madhuri@gmail.com,Bangalore,Karnataka,9122099312,Dept03
EMP0010,Vikram,vikram@gmail.com,Bangalore,Karnataka,9122111312,Dept03
EMP0011,Sathya,sathya@gmail.com,Mangalore,Karnataka,9122823000,Dept03
EMP0012,Siva,siva@gmail.com,Bangalore,Karnataka,9122823876,Dept03
EMP0013,Sarthak,sarthak@gmail.com,Bellary,Karnataka,9127623876,Dept01
EMP0014,Sunil,sunil@gmail.com,Bellary,Karnataka,9122823321,Dept02
EMP0015,Nirmalya,nirmalya@gmail.com,Bangalore,Karnataka,9122890876,Dept03
EMP0016,Ashok,ashok@gmail.com,Bangalore,Karnataka,9752823876,Dept06
EMP0017,Priyanka,priyanka@gmail.com,Belgaon,Karnataka,9986523876,Dept06
EMP0018,Monalisha,mocalisha@gmail.com,Bangalore,Karnataka,9981223876,Dept06
EMP0019,Nitu,nitu@gmail.com,Belgaon,Karnataka,9097623876,Dept02
EMP0020,Sipu,sipu@gmail.com,Belgaon,Karnataka,9562123876,Dept05
EMP0021,Neha,neha@gmail.com,Mangalore,Karnataka,9094423876,Dept05
EMP0022,Rohit,rohit@gmail.com,Bangalore,Karnataka,9983823876,Dept05
EMP0023,Nageswar,nageswar@gmail.com,Bangalore,Karnataka,9987823876,Dept04
EMP0024,Chandan,chandan@gmail.com,Bangalore,Karnataka,9167583876,Dept04
EMP0025,Sambhu,sambhu@gmail.com,Bellary,Karnataka,9190873876,Dept04
create table employee (EmpId string,EmpName string,Email string,City string,State string,Mobile string,DeptId string)
row format delimited fields terminated by ',';
load data local inpath '/home/ubuntu/Documents/WorkingFiles/employees.txt' into table employee;
select * from employee;
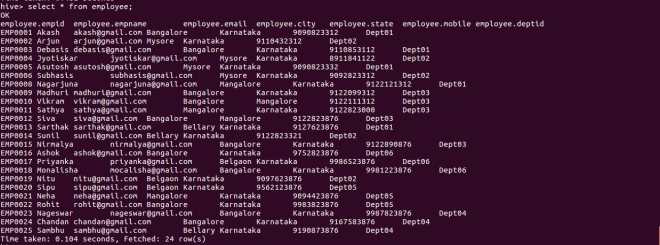
You can verify employees.txt in “/user/hive/warehouse/retail.db/employee”(http://localhost:50070/).
Aggregate Functions :
After loading the data into the Hive table we can apply the Data Manipulation Statements or aggregate functions to retrieve the data.
Example to count number of records :
Count aggregate function is used to count the total number of the records in a table.
select count(*) from item;
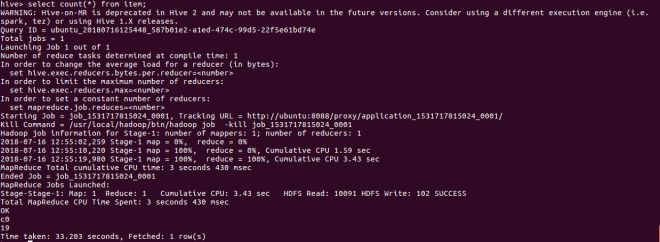
You can see the progress of mapreduce job in http://localhost:8088/cluster.

Create external Table :
The create external keyword is used to create a table and provides a location where the table will create, so that Hive does not use a default location for this table. An EXTERNAL table points to any HDFS location for its storage, rather than default storage.
create external table employee_external(EmpId string,EmpName string,Email string,City string,State string,MobileNo string,DeptId string) row format delimited fields terminated by ',' Location '/user/external';
You can verify in browser by browsing hdfs “/user/external”.
Insert Command :
The insert command is used to load data to Hive table. Inserts can be done to a table or a partition.
- INSERT OVERWRITE is used to overwrite the existing data in the table or partition.
- INSERT INTO is used to append the data into existing data in a table.
from Employee emp insert overwrite table Employee_External select emp.EmpId,emp.EmpName,emp.Email,emp.City,emp.State,emp.Mobile,emp.DeptId;
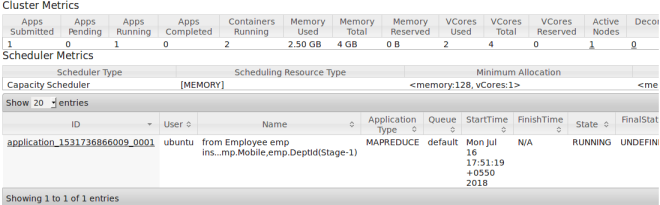
You can see the progress of mapreduce job in http://localhost:8088/cluster.
select * from Employee_External;

drop table Employee_External;
If you drop an external table only metadata will be deleted not the actual data. Verify it in ‘/user/external’.
select * from employee_external;
The above will show you an error which is given below;

External table is useful when we refer multiple tables with same data. In other words, creating external table helps to maintain multiple tables by referring same data. If a user deleted the table, only that table’s metadata will be deleted. So it will not affect the work of other users.
Example for “Partitioned By” and “Clustered By” Command
“Partitioned by” is used to divide the table into partition and can be divided in to buckets by using the “Clustered By” command.
Example Partition by :
create table EmployeeByDeptId(EmpId string,Name string,Email string,City string,State string,MobileNo string) partitioned by (DeptId string) row format delimited fields terminated by ',' stored as textfile;
When we insert the data, Hive throw errors, the dynamic partition mode is strict and dynamic partition is not enabled. So we need to set the following parameters in Hive shell.
set hive.exec.dynamic.partition.mode=nonstrict;
To enable dynamic partitions, by default, it’s false.
set hive.exec.dynamic.partition=true;
Insert data into EmployeeByDeptId using below query;
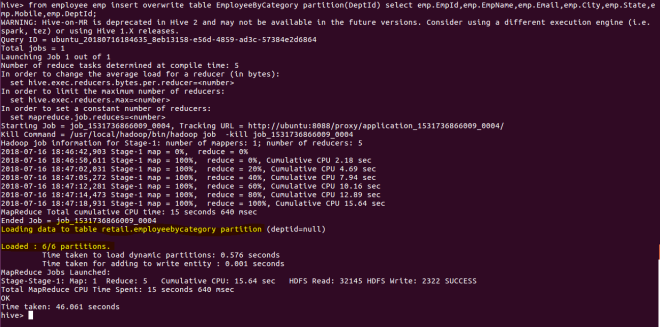
from employee emp insert overwrite table EmployeeByDeptId partition(DeptId) select emp.EmpId,emp.EmpName,emp.Email,emp.City,emp.State,emp.Mobile,emp.DeptId;
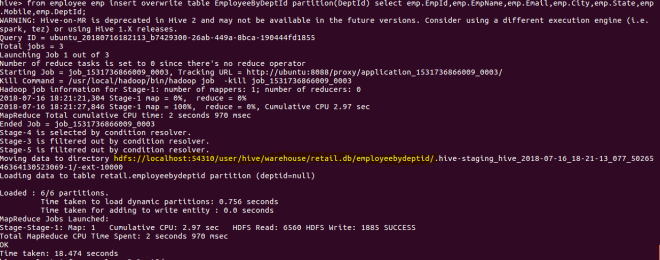
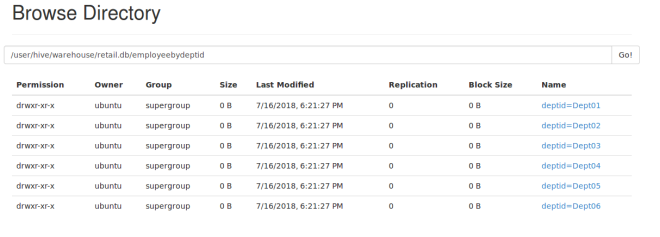
In the above screenshot, you can see the inserted data has been saved under retail.db/employeebydeptid. It created 6 partitions according to the data we have. In other words, there are 6 unique DeptIds, so it created 6 partitions.
You can view this table and partitions in configured hdfs url. In my case it is http://localhost:50070/.
Partition is done by the DeptId and can be divided further into buckets by using the ‘Clustered By’ command.
Example 1 Clustered by :
create table EmployeeByCategory(EmpId string,Name string,Email string,City string,State string,MobileNo string) partitioned by (DeptId string) clustered by(City) into 5 buckets row format delimited fields terminated by ',' stored as textfile;
From the above query;
We are creating EmployeeByCategory table with partitioned by DeptId and then clustered it by City into 5 buckets.
Once data gets loaded, it will automatically create 5 buckets and place the data into those buckets.
from employee emp insert overwrite table EmployeeByCategory partition(DeptId) select emp.EmpId,emp.EmpName,emp.Email,emp.City,emp.State,emp.Mobile,emp.DeptId;
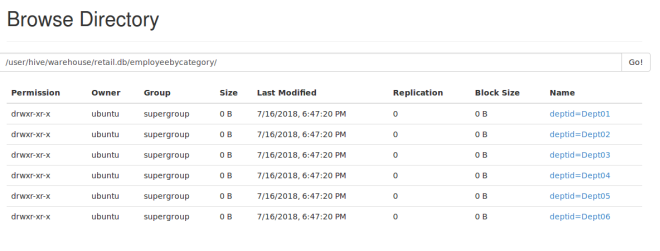
Once we load the data, we can also browse hdfs to see the partitions and buckets.
Partitions :
Buckets :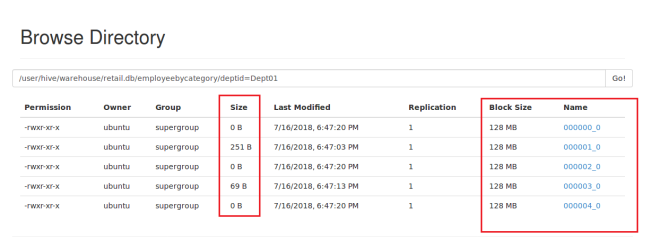
You can see it created 5 buckets under Dept01. Here sample data is less so it created buckets but couldn’t distribute data to all buckets.
Example 2 Clustered by :
In the above example we have created buckets after partition. Here in this example we will create buckets without creating partitions.
Create table EmployeeByCity(EmpId string,Name string,Email string,City string,State string,MobileNo string) clustered by (City) into 3 buckets row format delimited fields terminated by ',' stored as textfile;
from Employee emp insert overwrite table EmployeeByCity select emp.EmpId,emp.EmpName,emp.Email,emp.City,emp.State,emp.Mobile;
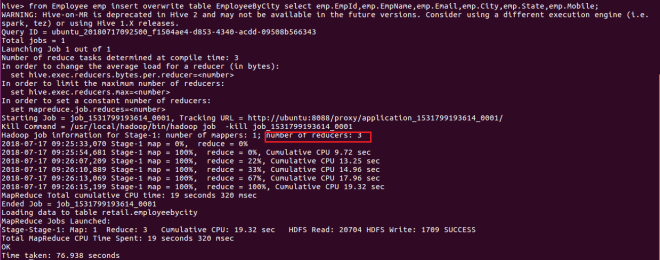
One thing to notice is that the number of reducer is dependent upon number of buckets we are creating. We have created 3 buckets, so 3 reducers.
You can see the output in hdfs browser as well;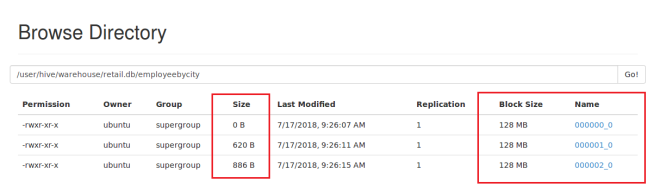
Select & Filters :
You can also filter data by specifying conditions in where clause.
Example :
select * from item where salerate > 700 and salerate < 1200;
select * from item where company = 'PUMA';
Here the results will be displayed on the console. It will not be stored anywhere.
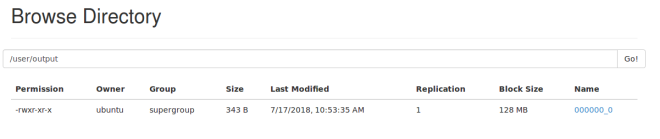
INSERT OVERWRITE DIRECTORY '/user/output' SELECT i.* FROM Item i Where i.company = 'PUMA'
Above query will put the result data to ‘/user/output’ directory. You can browse hdfs to view.
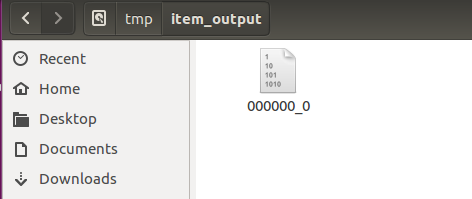
INSERT OVERWRITE LOCAL DIRECTORY '/tmp/item_output' SELECT i.* FROM Item i Where i.company = 'PUMA'
Above query will put the result data to ‘/tmp/item_output’ directory. You can see it in your local system.
Aggregation :
select count(*) from employee;
select count(distinct(DeptId)) from employee;
Grouping :
Group by command is used to group the result-set by one or more columns.
select ModelNo,sum(StockQty) from item group by ModelNo;
select CompanyId,sum(StockQty) from item group by CompanyId;
Create table CompanyItems(Company string,Count int) row format delimited;
Insert OVERWRITE table CompanyItems Select i.Company,Count(*) from Item i group by i.Company;
select * from CompanyItems;
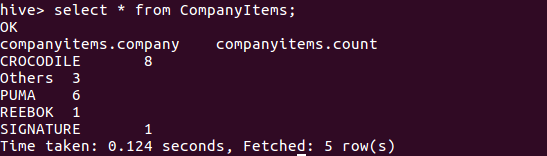
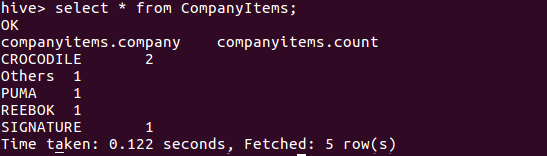
From Item i Insert OVERWRITE table CompanyItems Select i.Company,Count(*) where i.SaleRate > 500 group by i.Company;
Select * from CompanyItems;
From Item i Insert OVERWRITE table CompanyItems Select i.Company,Count(*) where i.SaleRate > 1000 group by i.Company;
Select * from CompanyItems;
Sort By, Order By, Distribute By & Cluster By :
Sort By :
Hive uses the columns in SORT BY to sort the rows before feeding the rows to a reducer. The sort order will be dependent on the column types. If the column is of numeric type, then the sort order is also in numeric order. If the column is of string type, then the sort order will be lexicographical order.
Data at each reducer will be sorted, but each reducer can have overlapping ranges of data.
Let’s see an example;
We are sorting following 8 rows to 2 reducer:
1000
3000
4000
2000
1500
5500
5400
6000
Reducer 1:
1000
4000
5400
Reducer 2:
1500
2000
3000
5500
6000
From the above example you can see the data is sorted at each reducer but both the reducer have overlapping ranges of data.
Select BarcodeId,StockQty from Item sort by StockQty desc;
Order By :
This is similar to ORDER BY in SQL Language.
In Hive, ORDER BY guarantees total ordering of data, but for that it has to be passed on to a single reducer. There are some limitations in the “order by” clause. In the strict mode (i.e., hive.mapred.mode=strict), the order by clause has to be followed by a “limit” clause. The limit clause is not necessary if you set hive.mapred.mode to nonstrict. The reason is that in order to impose total order of all results, there has to be one reducer to sort the final output. If the number of rows in the output is too large, the single reducer could take a very long time to finish.
Select BarcodeId,StockQty from Items order by StockQty;
Select * from Items order by StockQty desc;
Note : By default the sort is ascending.
Distribute By :
Hive uses the columns in Distribute By to distribute the rows among reducers. All rows with the same Distribute By columns will go to the same reducer. However, Distribute By does not guarantee clustering or sorting properties on the distributed keys.
Example ( taken directly from Hive wiki ):-
We are Distributing By x on the following 5 rows to 2 reducer:
x1
x2
x4
x3
x1
Reducer 1:
x1
x2
x1
Reducer 2:
x4
x3
Note that all rows with the same key x1 is guaranteed to be distributed to the same reducer (reducer 1 in this case), but they are not guaranteed to be clustered in adjacent positions.
Select * from Items distribute by BarcodeId;
Cluster By :
If we use Cluster By x for same example shown above, the two reducers will further sort rows on x:
Reducer 1 :
x1
x1
x2
Reducer 2 :
x3
x4
Instead of specifying Cluster By, the user can specify Distribute By and Sort By, so the partition columns and sort columns can be different.
SELECT col1, col2 FROM t1 DISTRIBUTE BY col1 SORT BY col1 ASC, col2 DESC
Join :
Create a text file named as depts.txt. Sample contents are given below;
Dept01,IT,Ashis
Dept02,Sales,Sumit
Dept03,Marketing,Akash
Dept04,Accounts,Khushal
Dept05,HR,Sanvi
Dept06,Operations,Saloni
Dept07,R&D,Anvitha
Dept08,Security,Preeti
create table Dept(DeptId string,DeptName string,HOD string) row format delimited fields terminated by ',' stored as textfile;
load data local inpath '/home/ubuntu/Documents/WorkingFiles/depts.txt' into table Dept;
Inner Join :
select emp.EmpId,emp.EmpName,emp.Mobile,emp.Email,emp.City,d.DeptId,d.DeptName,d.HOD from Employee emp join Dept d on emp.DeptId = d.DeptId;
Left Outer Join :
select emp.EmpId,emp.EmpName,emp.Mobile,emp.Email,emp.City,d.DeptId,d.DeptName,d.HOD from Employee emp left outer join Dept d on emp.DeptId = d.DeptId;
Right Outer Join :
select emp.EmpId,emp.EmpName,emp.Mobile,emp.Email,emp.City,d.DeptId,d.DeptName,d.HOD from Employee emp right outer join Dept d on emp.DeptId = d.DeptId;
Full Outer Join/ Full Join :
select emp.EmpId,emp.EmpName,emp.Mobile,emp.Email,emp.City,d.DeptId,d.DeptName,d.HOD from Employee emp Full outer join Dept d on emp.DeptId = d.DeptId;
Hive Views
Hive views are used to save any result set data similar to Views in SQL. Once you try to fetch records the map/reduce jobs will run.
Syntax : Create View [View_Name] AS Select_Query
CREATE VIEW ItemView AS SELECT Company,count(*) as NoOfCompany FROM Item WHERE SaleRate > 1000 group by Company;
SELECT * from ItemView;
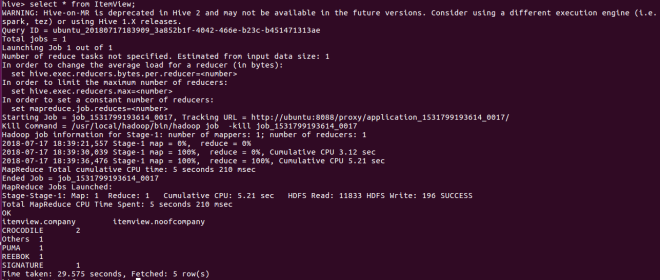
You can see in the above screenshot, once you try to retrieve the records map/reduce job got executed.
MultiTable Insert :
Let’s create three tables where we are going to insert data from one single table.
create table ModelWiseStock (ModelNo string,StockQty int) row format delimited;
create table CompanyWiseStock (Company string,StockQty int) row format delimited;
create table TotalStockCompanyWise (Company string,Count int) row format delimited;
from item i
 insert overwrite table ModelWiseStock select i.ModelNo,i.StockQty
 insert overwrite table CompanyWiseStock select i.Company,i.StockQty where StockQty > 100
 insert overwrite table TotalStockCompanyWise select i.Company ,count(*) where i.SaleRate > 1000 group by i.Company
 insert overwrite local directory '/tmp/local_output/ItemStock' select i.Company,i.ModelNo,Sum(StockQty) group by i.Company,i.ModelNo;
Custom mapper Code to manipulate unix timestamp and trim comment of users using Python
create database if not exists Movie;
use Movie;
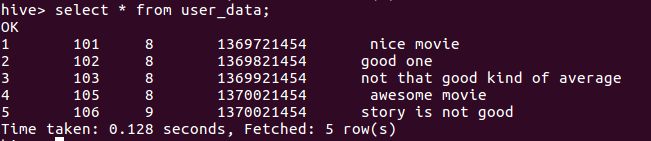
CREATE external TABLE user_data ( userid INT, movieid INT, rating INT, unixtime STRING,comment STRING) ROW FORMAT DELIMITED FIELDS TERMINATED BY '\t' STORED AS textfile;
Create a text file(rating.txt). Sample contents are given below.
rating.txt
1	101	8	1369721454	 nice movie
2	102	8	1369821454	good one
3	103	8	1369921454	not that good kind of average
4	105	8	1370021454  	 awesome movie
5	106	9	1370021454	story is not good
LOAD DATA LOCAL INPATH '/home/ubuntu/Documents/WorkingFiles/rating.txt' OVERWRITE INTO TABLE user_data;
select * from user_data;
Add below code in python and save the file named as “weekday_mapper.py”.
weekday_mapper.py
import sys
import datetime
try:
 for line in sys.stdin:
 line = line.strip()
 userid, movieid, rating, unixtime, comment = line.split('\t')
 weekday = datetime.datetime.fromtimestamp(float(unixtime)).isoweekday()
 trimmedcomment = comment.strip();
 print ('\t'.join([userid, movieid, rating, str(weekday),trimmedcomment]))
except:
 print (sys.exc_info())
Create a new table for storing weekday and trimmed comment.
CREATE TABLE u_data_new ( userid INT,movieid INT, rating INT, weekday INT,comment STRING) ROW FORMAT DELIMITED FIELDS TERMINATED BY '\t';
Add the file in hive as a resource so that it will be available for executing.
add FILE /home/ubuntu/Documents/WorkingFiles/weekday_mapper.py;

INSERT OVERWRITE TABLE u_data_new SELECT TRANSFORM (userid, movieid, rating, unixtime,comment) USING 'python weekday_mapper.py' AS (userid, movieid, rating, weekday,comment) FROM user_data;
select * from u_data_new;
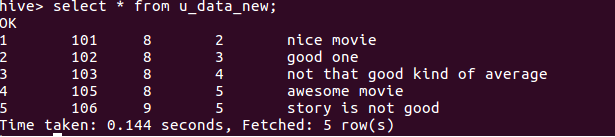
You can see the output which contains trimmed comment and weekday.
Call an user defined function written in java from Hive
WAP to take a string and key as input and encrypt it.
- Create a java project in eclipse and name it as UDFHive.
- Convert this to maven project.
- Add necessary dependencies in pom.xml file.
pom.xml :
 <dependencies>
   <!-- https://mvnrepository.com/artifact/org.apache.hadoop/hadoop-common -->
   <dependency>
     <groupId>org.apache.hadoop</groupId>
     <artifactId>hadoop-common</artifactId>
     <version>3.0.0</version>
     <scope>provided</scope>
   </dependency>

   <dependency>
     <groupId>org.apache.hive</groupId>
     <artifactId>hive-exec</artifactId>
     <version>1.2.1</version>
     <scope>provided</scope>
   </dependency>
 </dependencies>
- Create a file -> java class -> name it as Deidentify.
- import all necessary libraries.
- Add below code.
Deidentify.java
package udfhive;
import java.security.InvalidKeyException;
import java.security.NoSuchAlgorithmException;
import javax.crypto.BadPaddingException;
import javax.crypto.Cipher;
import javax.crypto.IllegalBlockSizeException;
import javax.crypto.NoSuchPaddingException;
import javax.crypto.spec.SecretKeySpec;
import org.apache.commons.codec.binary.Base64;
import org.apache.hadoop.hive.ql.exec.UDF;
import org.apache.hadoop.io.*;

public class Deidentify extends UDF
 {
   private static String key = "abcdefgh12345678"; // length of the key must be
   // 16 char
   private Text result = new Text();

   // If you don't pass the key.
   public Text evaluate(Text str) {
    if (str == null) {
     return null;
   }
   try {
     result.set(encrypt(str.toString(), key.getBytes()));
   } catch (InvalidKeyException e) {
     // TODO Auto-generated catch block
     e.printStackTrace();
   } catch (NoSuchAlgorithmException e) {
    // TODO Auto-generated catch block
    e.printStackTrace();
  } catch (NoSuchPaddingException e) {
    // TODO Auto-generated catch block
    e.printStackTrace();
  } catch (IllegalBlockSizeException e) {
    // TODO Auto-generated catch block
    e.printStackTrace();
  } catch (BadPaddingException e) {
    // TODO Auto-generated catch block
    e.printStackTrace();
  }
  return result;
 }

// key passed
  public Text evaluate(Text str, String key) {
   if (str == null) {
    return null;
   }
  try {
   result.set(encrypt(str.toString(), key.getBytes()));
  } catch (InvalidKeyException e) {
    // TODO Auto-generated catch block
    e.printStackTrace();
  } catch (NoSuchAlgorithmException e) {
    // TODO Auto-generated catch block
    e.printStackTrace();
  } catch (NoSuchPaddingException e) {
    // TODO Auto-generated catch block
    e.printStackTrace();
  } catch (IllegalBlockSizeException e) {
    // TODO Auto-generated catch block
    e.printStackTrace();
  } catch (BadPaddingException e) {
    // TODO Auto-generated catch block
   e.printStackTrace();
  }
  return result;
 }

// Encryption logic
  private String encrypt(String strToEncrypt, byte[] key)
  throws NoSuchAlgorithmException, NoSuchPaddingException,
  InvalidKeyException, IllegalBlockSizeException, BadPaddingException
   {
    Cipher cipher = Cipher.getInstance("AES/ECB/PKCS5Padding");
    SecretKeySpec secretKey = new SecretKeySpec(key, "AES");
    cipher.init(Cipher.ENCRYPT_MODE, secretKey);
    String encryptedString =
    Base64.encodeBase64String(cipher.doFinal(strToEncrypt.getBytes()));
    System.out.println("------------encryptedString" + encryptedString);
    return encryptedString.trim();
   }
 }
- Right click on project -> select export -> select java -> select JAR file
- Click on next -> give the name as hive-udf.jar -> click on finish.
- jar file will be created in your configured workspace. To see the jar file, right click on project -> select properties -> under location you can see ‘/home/ubuntu/eclipse-workspace/UDFHive’.
- Open a new terminal -> change the directory and point to eclipse-workspace.
cd /home/ubuntu/eclipse-workspace/
- move/copy the hive-udf.jar file to hive’s lib folder.
sudo cp hive-udf.jar /usr/local/hive/lib
- Create Customer.csv file. Sample contents are given below;
 cust001,ACC009121212,X Bank,X00921,Marathahalli
 cust002,ACC009123412,Y Bank,Y00921,ECity
 cust003,ACC009190648,Z Bank,X00921,JP Nagar
 cust004,ACC009128122,X Bank,X00921,New-Highway
 cust005,ACC009182393,X Bank,X00921,Old-Road
 cust006,ACC007541273,X Bank,X09364,Ring-Road
 cust007,ACC007624533,C Bank,C00936,Devanahalli
 cust008,ACC007454555,Z Bank,Z00936,Devanahalli
 cust009,ACC008344343,Z Bank,Z00952,BTM Layout
 cust010,ACC008234343,Z Bank,Z00952,BTM Layout
- Navigate to hive shell and add below commands to create Customer table and CustomerDeidentified table(contains encrypt data).
use retail;
create external table Customer(CustomerId string,AccountNo string,BankName string,BankIFSCCode string,BankBranch string) row format delimited fields terminated by ',';
load data local inpath '/home/ubuntu/Documents/WorkingFiles/Customers.csv' into table Customer;
- Add the created jar file so that it will be available to hive for processing.
ADD JAR /usr/local/hive/lib/hive-udf.jar;

- Create a temporary function as deIdentify which will be used to pass the column value to Java function.
CREATE TEMPORARY FUNCTION deIdentify AS 'udfhive.Deidentify';
create table CustomerDeidentified as select CustomerId,deIdentify(AccountNo),deIdentify(BankName),deIdentify(BankIFSCCode),deIdentify(BankBranch) from Customer;
In the above query, you can see we are calling the function deIdentify by passing column names.
select * from CustomerDeIdentified;

In the above screenshot you can see the column values are all Encrypted.
References :-
Related Topics :
Sqoop : Import data from MySQL to HDFS & Hive
